Now that you understand how to deploy and configure a private assembly, you can begin to examine the role of a shared assembly. Like a private assembly, a shared assembly is a collection of types and (optional) resources. The most obvious difference between shared and private assemblies is the fact that a single copy of a shared assembly can be used by several applications on the same machine.
Consider all the applications created in this text that required you to set a reference to System.Windows.Forms.dll. If you were to look in the application directory of each of these clients, you would not find a private copy of this .NET assembly. The reason is that System.Windows.Forms.dll has been deployed as a shared assembly. Clearly, if you need to create a machine-wide class library, this is the way to go.
NoteDeciding whether a code library should be deployed as a private or shared library is yet another design issue to contend with, and this will be based on many project-specific details. As a rule of thumb, when you are building libraries that need to be used by a wide variety of applications, shared assemblies can be quite helpful in that they can be updated to new versions very easily (as you will see).
As suggested in the previous paragraph, a shared assembly is not deployed within the same directory as the application that uses it. Rather, shared assemblies are installed into the Global Assembly Cache (GAC). The GAC is located in a subdirectory of your Windows directory named Assembly (e.g., C:\Windows\assembly), as shown in Figure 14-16.
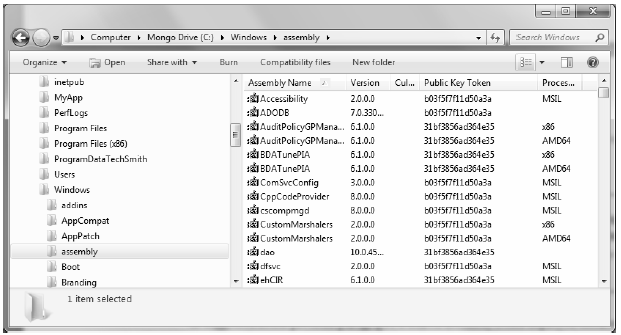
Figure 14-16 The global assembly cache
Note You cannot install executable assemblies (*.exe) into the GAC. Only assemblies that take the *.dll file extension can be deployed as a shared assembly.
Before you can deploy an assembly to the GAC, you must assign it a strong name, which is used to uniquely identify the publisher of a given .NET binary. Understand that a “publisher” can be an individual programmer, a department within a given company, or an entire company.
In some ways, a strong name is the modern-day .NET equivalent of the COM globally unique identifier (GUID) identification scheme. If you have a COM background, you may recall that AppIDs are GUIDs that identify a particular COM application. Unlike COM GUID values (which are nothing more than 128-bit numbers), strong names are based (in part) on two cryptographically related keys (public keys and private keys), which are much more unique and resistant to tampering than a simple GUID.
Formally, a strong name is composed of a set of related data, much of which is specified using assembly-level attributes:
To provide a strong name for an assembly, your first step is to generate public/private key data using the .NET Framework 4.0 SDK’s sn.exe utility (which you’ll do in a moment). The sn.exe utility generates a file (typically ending with the *.snk [Strong Name Key] file extension) that contains data for two distinct but mathematically related keys, the public key and the private key. Once the C# compiler is made aware of the location of your *.snk file, it will record the full public key value in the assembly manifest using the .publickey token at the time of compilation.
The C# compiler will also generate a hash code based on the contents of the entire assembly (CIL code, metadata, and so forth). As you recall from Chapter 6, a hash code is a numerical value that is statistically unique for a fixed input. Thus, if you modify any aspect of a .NET assembly (even a single character in a string literal) the compiler yields a different hash code. This hash code is combined with the private key data within the *.snk file to yield a digital signature embedded within the assembly’s CLR header data. The process of strongly naming an assembly is illustrated in Figure 14-17.
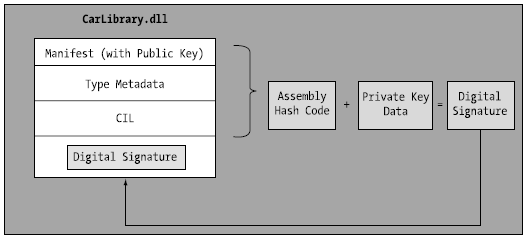
Figure 14-17 At compile time, a digital signature is generated and embedded into the assembly based in part on public and private key data
Understand that the actual private key data is not listed anywhere within the manifest, but is used only to digitally sign the contents of the assembly (in conjunction with the generated hash code). Again, the whole idea of using public/private key data is to ensure that no two companies, departments, or individuals have the same identity in the .NET universe. In any case, once the process of assigning a strong name is complete, the assembly may be installed into the GAC.
Note Strong names also provide a level of protection against potential evildoers tampering with your assembly’s contents. Given this point, it is considered a .NET best practice to strongly name every assembly (including *.exe assemblies), regardless of whether it is deployed to the GAC.
Let’s walk through the process of assigning a strong name to the CarLibrary assembly created earlier in this chapter. These days, you will most likely generate the required *.snk file using Visual Studio 2010, however in the bad old days (circa 2003), the only option for strongly signing an assembly was to do so at the command line. Let’s see how to do this.
The first order of business is to generate the required key data using the sn.exe utility. Although this tool has numerous command-line options, all you need to concern yourself with for the moment is the -k flag, which instructs the tool to generate a new file containing the public/private key information. Create a new folder on your C drive named MyTestKeyPair and change to that directory using the Visual Studio 2010 command prompt. Next, issue the following command to generate a file named MyTestKeyPair.snk:
sn -k MyTestKeyPair.snk
Now that you have your key data, you need to inform the C# compiler exactly where MyTestKeyPair.snk is located. Recall from earlier in this chapter, when you create any new C# project workspace using Visual Studio 2010, one of the initial project files (located under the Properties node of Solution Explorer) is named AssemblyInfo.cs. This file contains a number of attributes that describe the assembly itself. The [AssemblyKeyFile] assembly-level attribute can be added to your AssemblyInfo.cs file to inform the compiler of the location of a valid *.snk file. Simply specify the path as a string parameter, for example:
[assembly: AssemblyKeyFile(@"C:\MyTestKeyPair\MyTestKeyPair.snk")]
Note When you manually specify the [AssemblyKeyFile] attribute, Visual Studio 2010 will generate a warning informing you to use the /keyfile option of csc.exe or to establish the key file via the Visual Studio 2010 Properties window. You’ll use the IDE to do so in just a moment (so feel free to ignore the generated warning).
Because the version of a shared assembly is one aspect of a strong name, selecting a version number for CarLibrary.dll is a necessary detail. In the AssemblyInfo.cs file, you will find another attribute named [AssemblyVersion]. Initially the value is set to 1.0.0.0:
[assembly: AssemblyVersion("1.0.0.0")]
A .NET version number is composed of the four parts (<major>.<minor>.<build>.<revision>). While specifying a version number is entirely up to you, you can instruct Visual Studio 2010 to automatically increment the build and revision numbers as part of each compilation using the wildcard token, rather than with a specific build and revision value. We have no need to do so for this example; however, consider the following:
// Format: <Major number>.<Minor number>.<Build number>.<Revision number>
// Valid values for each part of the version number are between 0 and 65535.
[assembly: AssemblyVersion("1.0.*")]
At this point, the C# compiler has all the information needed to generate strong name data (as you are not specifying a unique culture value via the [AssemblyCulture] attribute, you “inherit” the culture of your current machine, which in my case would be US English).
Compile your CarLibrary code library, open your assembly into ildasm.exe, and check the manifest. You will now see that a new .publickey tag is used to document the full public key information, while the .ver token records the version specified via the [AssemblyVersion] attribute (see Figure 14-18).
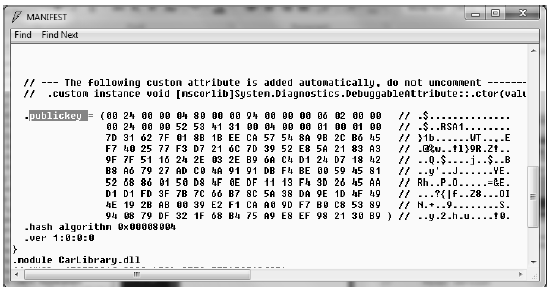
Figure 14-18 A strongly named assembly records the public key in the manifest
Great! At this point we could deploy our shared CarLibrary.dll assembly to the GAC. However, remember that these days, .NET developers can use Visual Studio to create strongly named assemblies using a friendly user interface rather than the cryptic sn.exe command line tool. Before seeing how to do so, be sure you delete (or comment out) the following line of code from your AssemblyInfo.cs file (assuming you manually added this line during this section of the text):
// [assembly: AssemblyKeyFile(@"C:\MyTestKeyPair\MyTestKeyPair.snk")]
Visual Studio 2010 allows you to specify the location of an existing *.snk file using the project’s Properties page, as well as generate a new *.snk file. To do so for the CarLibrary project, first doubleclick on the Properties icon of the Solution Explorer, and select the Signing tab. Next, select the Sign the assembly check box, and choose the New… option (see Figure 14-19).
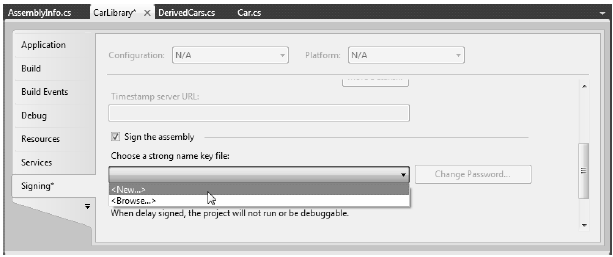
Figure 14-19 Creating a new *.snk file using Visual Studio 2010
Once you have done so, you will be asked to provide a name for your new *.snk file (such as myKeyFile.snk) and you’ll have the option to password-protect your file (which is not required for this example); see Figure 14-20.
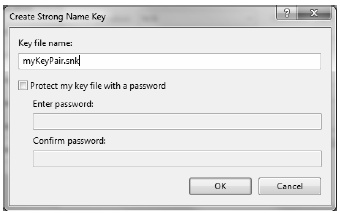
Figure 14-20 Naming the new *.snk file using Visual Studio 2010
At this point, you will see your *.snk file within the Solution Explorer (Figure 14-21). Every time you build your application, this data will be used to assign a proper strong name to the assembly.
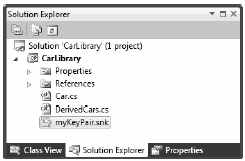
Figure 14-21 Visual Studio 2010 will now strongly sign your assembly with each compilation
Note Recall that the Application tab of the Properties editor provides a button named Assembly Information. When clicked, the button displays a dialog box that allows you to establish numerous assembly-level attributes, including the version number, copyright information, and so forth.
The final step is to install the (now strongly named) CarLibrary.dll into the GAC. While the preferred way to deploy assemblies to the GAC in a production setting is to create a Windows MSI installer package (or use a commercial installer program such as InstallShield), the .NET Framework 4.0 SDK ships with a command-line tool named gacutil.exe, which can be useful for quick tests.
Note You must have administrator rights to interact with the GAC on your machine, which may including adjusting the User Access Control (UAC) settings on Windows Vista or Windows 7.
Table 14-1 documents some relevant options of gacutil.exe (specify the /? flag when you run the program to see each option).
Table 14-1. Various Options of gacutil.exe
| Option | Meaning in Life |
|---|---|
| /i | Installs a strongly named assembly into the GAC |
| /u | Uninstalls an assembly from the GAC |
| /l | Displays the assemblies (or a specific assembly) in the GAC |
To install a strongly named assembly using gacutil.exe, first open a Visual Studio 2010 Command Prompt, change to the directory containing CarLibrary.dll, for example (your path may differ!):
cd C:\MyCode\CarLibrary\bin\Debug
Next, install the library using the -i command:
gacutil -i CarLibrary.dll
Once you have done so, you can verify that the library has been deployed by specifying the -l command (note that you omit the file extension when using the /l command):
gacutil -l CarLibrary
If all is well, you should see the following output to the Console window (you will find a unique PublicKeyToken value, as expected):
The Global Assembly Cache contains the following assemblies:
carlibrary, Version=1.0.0.0, Culture=neutral, PublicKeyToken=33a2bc294331e8b9,
processorArchitecture=MSIL
If you read previous editions of this book that covered .NET 1.0-.NET 3.5, this is where I would be telling you to open your machine’s Windows Explorer and view your installed CarLibrary in the GAC, simply by navigating to C:\Windows\assembly.
However (and this is a very big however), if you attempted to do so now, you would be stunned to find that you cannot see the expected CarLibrary icon under C:\Windows\assembly, even though gacutil.exe has verified the library has been installed!
With the release of .NET 4.0, the GAC has been split in two. Specifically, under C:\Windows\assembly you will find the location of the .NET 1.0-.NET 3.5 base class libraries (as well as various oddball assemblies, including libraries from third-party vendors). However, when you compile an assembly under .NET 4.0, and deploy it to the GAC using gacutil.exe, your library will be deployed to a brandnew location: C:\Windows\Microsoft.NET\assembly\GAC_MSIL.
Under this new folder, you will find a set of subdirectories, each of which is named identically to the friendly name of a particular code library (for example, \System.Windows.Forms, \System.Core, and so on). Beneath a given friendly name folder, you’ll find yet another subdirectory that always takes the following naming convention:
v4.0_major.minor.build.revision__publicKeyTokenValue
The “v4.0” prefix denotes that the library compiled under .NET version 4.0. That prefix is followed by a single underbar, then the version of the library in question, which in this example is version 1.0.0.0 of CarLibrary.dll. After a pair of underbars, you’ll see the publickeytoken value based on your strong name. Figure 14-22 shows the directory structure of my version of CarLibrary.dll on my Windows 7 operating system.
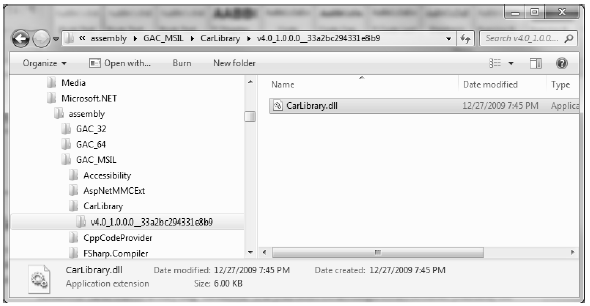
Figure 14-22 The strongly named, shared CarLibrary (version 1.0.0.0)